 For some reason we have been experiencing a very slow start to our normal cold and snowy winter here on the North Coast of Ohio. We’re grateful after last winter! Grateful - not stupid. We know, sooner rather than later, the Lake effect will carry in normal freezing temperatures and plenty of the white stuff.
When the snow flies in Northeastern Ohio, one of the more aggravating problem (in addition to our dysfunctional Browns) are Ice dams.
For some reason we have been experiencing a very slow start to our normal cold and snowy winter here on the North Coast of Ohio. We’re grateful after last winter! Grateful - not stupid. We know, sooner rather than later, the Lake effect will carry in normal freezing temperatures and plenty of the white stuff.
When the snow flies in Northeastern Ohio, one of the more aggravating problem (in addition to our dysfunctional Browns) are Ice dams.
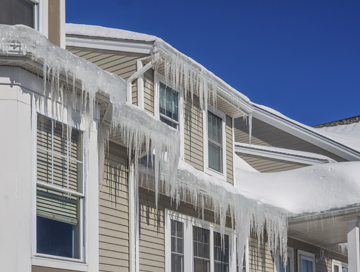
Ice dams form when melting snow roof freezes just at the edge roof and onto the gutter system. When the outside temperature drops below 32 degrees and the underside of the roof in the attic is so much warmer it warms the outside of the roof surface to a point where the snow begins to melt. Remember – heat rises, so when your furnace is cranked up to make your living area inside your home more comfortable the snow on the roof melts because the temperature of its underside through the attic is warmed from the rising indoor heat to the point that it melts.
Ice Dams Start and Get Worse After Heavy Snowfall
Snow has a tendency to be a good natural insulator, which can cause the outside roof surface to warm up, easier from the warm attic space causing the snow to melt faster.
Attics are classified for the most part as unconditional living space. They should be properly ventilated and insulated from the conditional part of the home (the space in which you live) or the rising heat will travel upwards causing a warm attic space. Additionally, because of inadequate outside air circulation (ventilation) through the attic it is necessary to keep the roof deck cold to eliminate the chance of regular melting snow. Poorly functioning soffit vents can compound the problem. Made worse, in addition to poor air circulation, is the introduction of heat from the occupied floor below the attic caused not only from rising heat but also from lighting, air leaks, and ductwork. During the day the water from the melted snow runs between the snow and the warm roof surface. The water then freezes and turns to ice when it gets past the exterior wall and hits a cold unheated roof edge or gutter or when the sun goes down and the cold of night settles in starting a build up of ice. The ice dam grows as the snow continues to melt, and as water continues to flow down the roof surface and freezes. When the water flow hits the ice it creates a larger and larger ice dam.
If an ice dam continues to grow, the ice can work its way back up the roof edge, get under shingles, melt and leak into the exterior wall, home or attic. Frequently the result of the damage will be water spots on ceilings and walls under the exterior roof damage. …a real mess inside and out.
Here are five ways that you can build a line of defense against the ice dam problem
1. Make sure your roof is properly ventilated
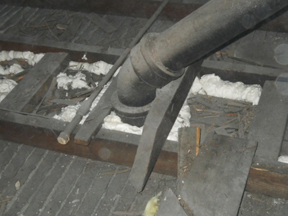
In all my experience the number one cause of the most problems in the field of home energy performance has been damage caused by poorly vented attic. Poor air circulation in the warmer months can cause condensation and mold problems and in the winter the dreaded structural damage caused by ice dams.
2. Seal all air leaks
Warm air escaping through wall and attic studs at the roof line can add just enough warmth to the roofline to cause snow to turn to water. To stop these pesky air leaks, often times unseen, takes professional diagnostics and foam sealant to close the tiniest of gaps. Only after these air leaks are stopped does it make sense to add insulation in the floor, and slopes of your attic.
3. Add additional insulation in your attic.
Remember, unless your attic has been turned into a functional living space, it should be considered unconditional space. Once the air leaks have been sealed installing insulation or adding to existing insulation forms a barrier between the conditioned living space and the attic. This separation has the added benefit of heating a physically smaller space – which also saves you money by using less fuel, especially in the winter months. 18 – 20” depth of insulation will provide you with an R-value suitable to prevent cold weather problems.
4. Hire a contractor who is an energy specialist or specializes in air sealing and insulation to do an in-home evaluation.
A good specialist will use diagnostic equipment designed to evaluate the performance of your home and generate a customized list of recommended improvements. Always ask for a whole-home evaluation that includes an on-site walk through as well as a blower door test and attic ventilation inspection. A trained local technician inspects many similar homes throughout the year and should be familiar with the region’s weather and types of homes in your area. The experience allows them to pinpoint the problems that they have regularly uncovered in the past.
Be Safe Not Sorry
In this challenging economy it is understandable that many homeowners have become educated in many areas of home improvement out of necessity. Weekend visits to the home improvement stores, do-it-yourself television and how to digital instructions provides both the means and the ends to common design and home improvement projects. Please be careful though to know your limitations - better safe than sorry.
Especially in the winter months when ice damming occurs DON’T GET ON THE ROOF YOURSELF TO SOLVE THE PROBLEM IT IS UNSAFE AND DANGEROUS. Also avoid reaching up and trying to chip away the ice with a pick ax or other tools. You could easily cause damage to your roof and be injured by falling or loose debris or tools. Be prepared early – In the warmer months is always a good idea to clean out the gutters before the first sign or snow. Clean gutters ensure good drain flow and will also help prevent the dreaded ice dams.
 DO YOU HAVE HIDDEN CASH IN YOUR PROPERTIES?
  Ensure that your home is ready for winter